Sun Mapping Your Garden Will Help You Pick Perfect Plants
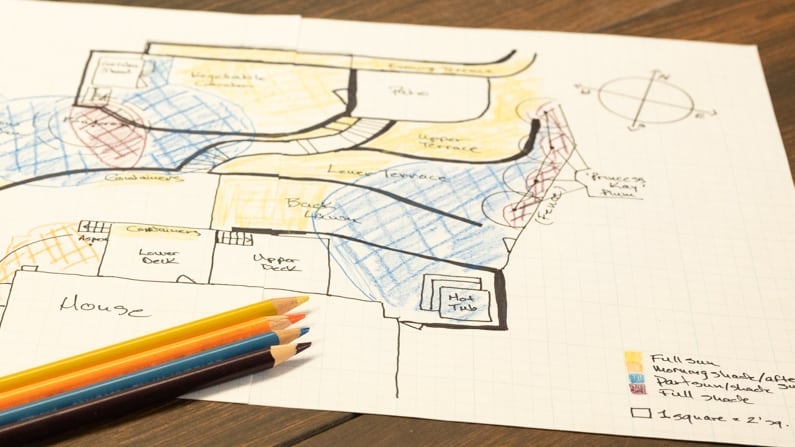
INSIDE: Sun mapping your garden doesn’t have to be hard. Here’s the secret to mapping the sun and shade in your yard so you can learn how sunlight will affect your plants.
Want to do a better job of choosing the right plants for your garden?
A sun map of your yard will help you do just that!
It helps you choose the right plants for your garden based on the amount of sun they need.
This means you’ll avoid problems like sun scald or lanky, stretched-out plants.
Mapping the sun exposure in your yard is simple. All you need is a few common tools and a sunny day.
When you’re done, you’ll have a map to use as a handy guide when selecting and placing plants in your garden.
Keep reading to see how easy it is!
This post contains Amazon affiliate links. As an Amazon Associate, I earn from qualifying purchases. So, I may get a small commission if you buy something after clicking through. I only link to products I would recommend to my best friend.
Before You Forget…
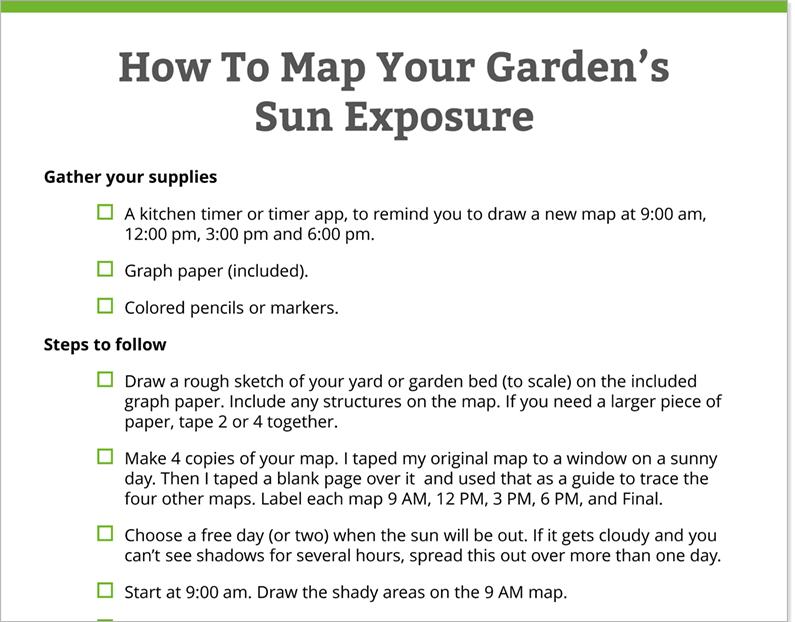
Download my free sun mapping checklist.
It makes it easy to calculate and map your garden’s sun exposure and find the perfect spot for every plant!
Here’s a sneak peek of your free step-by-step guide:
Step 1: Gather your materials
Let’s get ready to map your garden’s sunlight like a pro!
First, you’ll need a few essential tools to help with the task. Don’t worry, these items are easy to find, and you probably already have them at home.
Tape measure
You’ll need to take a few measurements in your yard to make sure you draw an accurate map.
Graph paper
This makes it easier to create a map of your garden area. With the grid lines, it’s a breeze to draw your property accurately and to scale.
If you don’t have graph paper, download my garden sunlight calculator, which includes a printable version of this article’s checklist and free printable graph paper.
In a pinch, any sheet of plain paper will do, but graph paper will make your life so much easier!
Tracing paper (or wax paper)
Using tracing paper to create your sun-tracking maps throughout the day makes it much easier to create your final map.
You could use wax paper instead and a sharpie to mark the shade; just be careful not to smudge the ink until it dries. Wax paper is slightly opaquer than tracing paper and trickier to work with.
I found 11” x 14” tracing paper to be the right size for my maps.

Ruler
A ruler will help you draw straight lines for buildings and property lines, ensuring the best results.
Colored pencils
To track and visualize the different sun exposures in your garden, you will need four colored pencils.
Assigning a unique color for each level of sun exposure (full sun, morning sun/afternoon shade, part shade/sun, and shade) will help you quickly identify the optimal spots for various types of plants in your garden.
I used yellow, orange, green, and purple.
Yellow for full sun, orange for morning shade/afternoon sun, green for part-shade/sun, and purple for shade.
The most successful gardens take Mother Nature into account. Your sun map will make a huge difference in helping your plants thrive!
Black marker
Using a marker, such as a Sharpie, to draw your initial map makes it easy to erase any mistakes without disturbing the map boundary lines when you use it to create your sun map.
Scotch tape, eraser, scissors, and paper clips
These will come in handy as you create your map.
A smooth, hard writing surface
This is for capturing your shade drawings out in the garden. You could use a clipboard, a large piece of cardboard, or even a smooth-topped table that affords a full view of your yard. (I used a rigid placemat that happened to be the right size.)
Related: What does full sun mean?
Landscaping template (optional)
This is totally optional. But it’s a fun and easy way to add trees and shrubs to your drawing.
Camera or smartphone (optional)
A camera or your smartphone can be tremendously helpful in capturing different perspectives of your garden throughout the day.
You can easily refer to these pictures later to recall sun exposure in various garden areas.
Now that you have gathered all your materials, it’s time to begin sun-mapping your garden!
In the next step, you’ll learn how to sketch your property so you can accurately map your sunlight.
Looking for an easy way to know how much sun your garden gets? Map the sun exposure on your property with this free and easy-to-use DIY sunlight calculator!
Step 2: Create a map of your yard
If you have a landscape blueprint/diagram, you should be able to create your map by tracing it. If you don’t, follow these steps.
- Create a rough sketch that you make out in your yard.
- Take measurements of the area you want to document.
- Add the measurements of the property lines, buildings, and hardscaping.
- Create your yard map.
- Draw your yard (or garden area) on your graph paper.
- Draw everything in pencil first.
- Transfer your measurements from your rough sketch to your graph paper.
- Try to draw things to scale, but don’t stress too much about getting everything exact.
- Start by sketching your property lines.
- Add any structures and hardscaping to your map. This includes:
- buildings
- pathways
- patios
- fences
- walls
- any other man-made thing that might cast shadows throughout the day.
- Draw the outlines of your garden beds and any turf areas and label these areas. You’ll want to label flower beds and your vegetable garden.
- Add all trees, hedges, and tall shrubs to your map (anything that casts shade).
- When you’re satisfied with your drawing, go over the pencil with a black marker.
- Note the compass directions on your map.
- You can use a compass app on your phone or use Google Maps to orient your map. I traced the compass reading from my phone onto my map.
- It’s not necessary to get super exact here; just do the best you can with it.

- Create your “shade maps.”
- Pull out four pieces of tracing paper.
- Make sure the tracing paper is as large as (or larger than) your yard map. Tape multiple pieces together if it’s not.
- Label the shade maps using a different color pencil for each map.
- Label the first one 9 am, the second one 12 pm, the third one 3 pm, and the fourth one 6 pm.
- Draw a few reference marks on each tracing paper map. This will help you line them up properly later.
Once you’ve completed your initial maps, it’s time to choose a day to observe and track the sun’s movements through your garden.
Snag a free printable step-by-step checklist that covers everything in this article.
Step 3: Choose the best day to sun map your garden
Before getting started on your sun map, it’s crucial to choose the right day for your sun mapping project.
If you live close to the equator, you can measure sun and shade at any time of year if your deciduous trees haven’t dropped their leaves.
For the rest of us, it’s best to make the measurements in the summer. A day close to the summer solstice is ideal.
And pick a day predicted to have minimal cloud coverage between 9am and 6pm. Some clouds are OK, but don’t do this on an overcast day. Or, plan to do it over a couple of days.
This will help ensure accurate results when you complete the next step.
Quick tip: For the best possible results, download my free sun mapping checklist, which includes a sun exposure cheat sheet.
Step 4: Measure the sunlight
Now that your mostly sunny day has arrived, it’s time to measure the sun in your yard.
At this stage, rather than measure how much direct sun exposure your garden gets, you’re going to create shade maps.
The best times to check for sun exposure are at 9:00 am, 12:00 pm, 3:00 pm, and 6:00 pm.
This is why we’ve created four shade maps labeled with these times.
- Set a kitchen timer or a reminder on your phone so you don’t miss the time slots.
- Start at 9:00 am.
- Clip the first piece of tracing paper on top of your yard map, and place that on a smooth, hard surface (a table, a piece of cardboard, or a clipboard).
- When your timer goes off, head out to your garden armed with your yard map, colored pencil and the corresponding piece of tracing paper.
- Draw in the shady areas on the 9 AM map.
- Repeat this process at 12:00, 3:00, and 6:00.
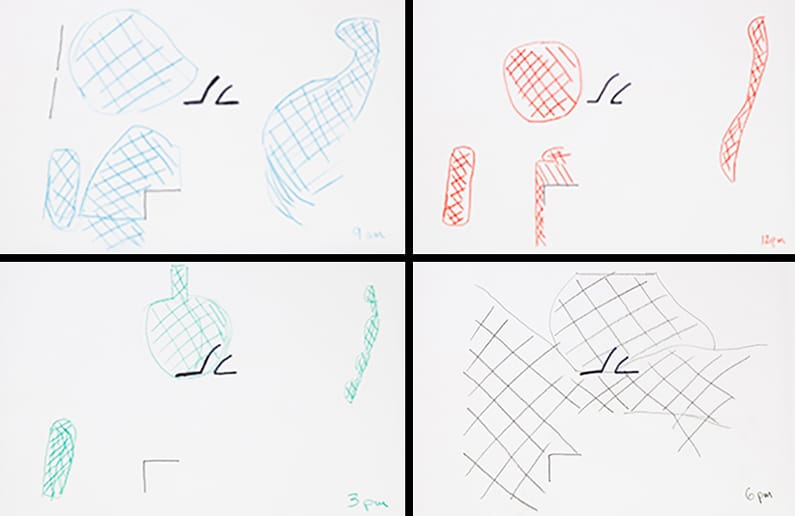
Once you’ve completed those steps, you’re ready to draw your final map!
Step 5: Create your final sun map
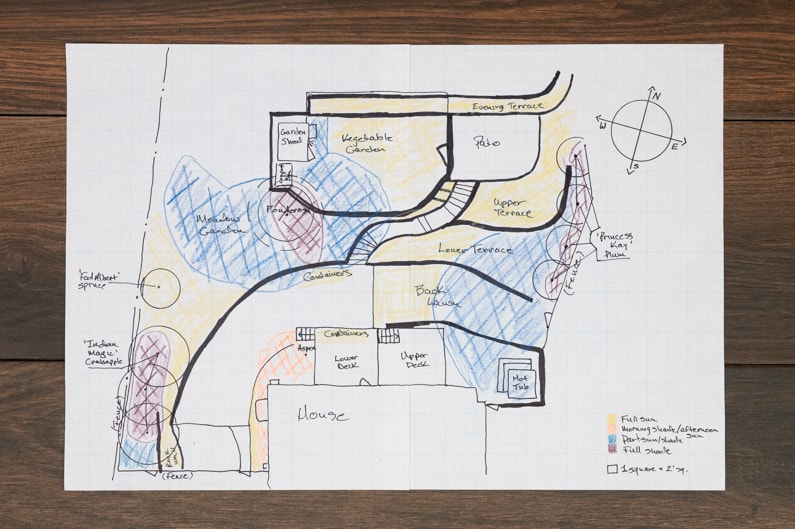
We’re going to use different colors to represent the varying levels of sunlight on our map.
Draw a color-key at the bottom of your yard map, noting which color is for sun, morning shade/afternoon sun, part-shade, and shade.
Here’s what I used: Yellow for full sun, orange for morning shade/afternoon sun, green for part-shade/sun, and purple for shade. But you can use any colors that make sense to you.
Look at the four maps you made throughout the day and turn them into one map.
- Stack the four shade maps on top of each other in descending order, starting with 9am at the bottom, and ending with the 6 pm map on the top.
- Line them up, using your reference marks.
- Clip them together with a paper clip or two.
- Place your yard map on top, and clip it into place, lining it up with your reference marks.
- Securely tape the stack to a sunny window. (Or use a lightbox, if you have one). Place two pieces of scotch tape in the upper left and right corners.
Note the shady, partly shady/sunny, and sunny areas based on these measurements:
- Full sun: 6+ hours of sun per day
- Morning shade/afternoon sun: 3+ hours of morning shade and 4+ of sun after 12pm.
- Part-shade/part-sun: 3-5 hours of sun per day
- Full shade: 3 hours or less of sun per day
Here’s how to determine which sun exposure designation to assign to an area:
- If it gets 3 or more hours of morning shade and 4 or more hours of sun after 12pm, mark it as morning shade/afternoon sun.*
- If at least 3 of the maps show an area as shady, color that area as full-shade.
- If at least 3 of the maps show an area as sunny, mark that area as full sun.
- If it isn’t shady or sunny, mark it as part-shade.
- You may need to flip through the pages as you do this, to see what to mark. That’s why we only taped the top two corners to the window.
- When you’ve everything marked, carefully remove the tape from your finished sun map.
*If you have areas of morning shade/afternoon sun, only plant heat-tolerant full-sun or part-sun plants in these areas. The afternoon sun is too strong for partial-shade plants.
When you’re finished, you’ll finally know for certain which parts of your garden are sunny or shady!
Unless you live near the equator, sun angles vary by season.
So, if you garden in fall or winter, you may want to create sun maps for other times of the year as well.
FAQs
What is sun mapping?
Sun mapping is a technique that helps you determine how much sunlight each area of your garden gets throughout the day. By identifying the sunniest and shadiest spots, you can plan your garden layout accordingly and choose plants that will thrive in each area. Sun mapping is used in permaculture design. To sun map your garden, simply observe the sun’s path throughout the day and map the areas that receive full sun, partial sun, and full shade. This will help you make informed decisions about where to plant your vegetables, herbs, and flowers and ensure that they receive the right amount of sunlight to grow and flourish.
Which side of a garden gets the most sun?
If you live in the northern hemisphere typically, the south-facing side of your garden will receive the most sunlight throughout the day. This is because the sun is highest in the sky at noon, and a south-facing garden will receive direct sunlight for the longest period of time. If you’re unsure which side of your garden is the sunniest, you can map your garden’s sun exposure to determine where the sun shines the longest.
Is morning sun or afternoon sun better for a garden?
Morning sun is generally cooler and less intense than afternoon sun, which can help your plants retain moisture and prevent them from drying out. On the other hand, afternoon sun is generally warmer and more intense, which can help your plants grow faster and produce more fruit or flowers. But too much afternoon sun can also cause your plants to wilt or become stressed. By sun mapping your garden, you can determine which areas receive morning sun and which areas receive afternoon sun and choose the best plants for each area accordingly.
Don’t forget to check your plants’ sunlight preferences!
By sun mapping your garden, you can choose the best plants for each area of your garden.
Most plant labels and plant catalogs will give you a light recommendation like full sun, full sun to part-shade, full shade, or part-sun, etc. for a particular plant.
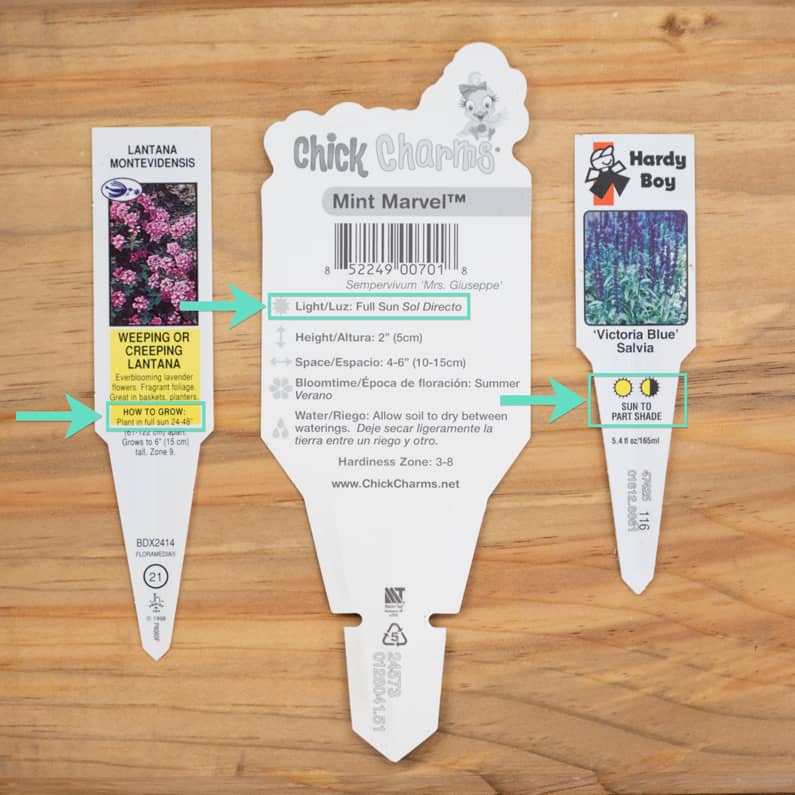
So, don’t skip over this info when purchasing plants!
The next time you’re considering purchasing a plant check its sun requirements against your sun map to help guide your decision.
Pro tip: Take a photo of your sun map with your smartphone so you have it with you when shopping for plants.
Related: What does full sun mean?
Don’t forget to use your sun map as a guide throughout the entire gardening season.
Update your map if there are any significant changes, such as the addition of new structures or the removal of large trees.
This will help you better understand the evolving sun exposure of your garden and make the necessary adjustments for your plants.
Grab your free sun mapping tool!
Print this checklist right now to start mapping the sun in your yard.

Creating a simple map of your garden, including buildings and other structures that might cast shadows, is the best way to track your yard’s sun exposure throughout the day.
Doing so will give you a clearer understanding of how sunlight moves across your space and where plants will best thrive.
Now that you know how many hours of sunlight your garden gets, you may be wondering what causes microclimates?

